Basic First Aid for Emergencies
by Riot Medicine
Intro
This zine covers the basics of first aid to help you and those around you in emergencies.
It’s short, meant to be packed in your first aid kit and serve as a reference in case you need it.
When disaster strikes, help may be hours, days, or even weeks away, and medical resources can be limited.
Being able to treat injuries or illnesses yourself can prevent them from becoming serious while waiting for more qualified help, and it can mean one less person who has to be treated by strained medical resources.
Your Safety
Your safety is more important than reaching a patient. If you get hurt while trying to help them, they will not get help, and now there are two patients.
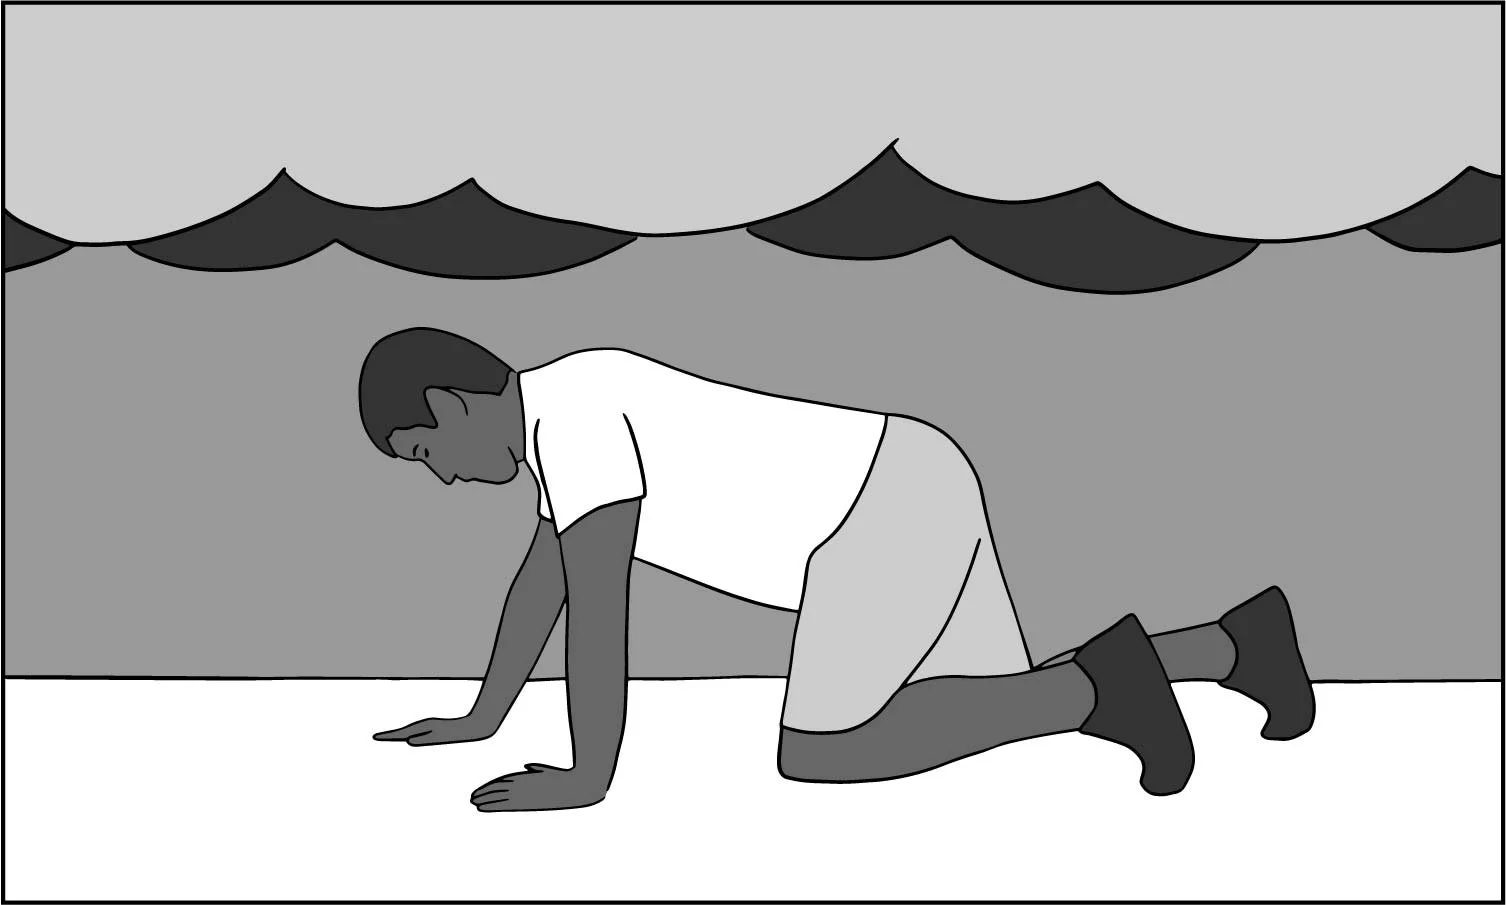
When moving through a burning building, crawl and stay low to avoid inhaling hot gases.
Avoid touching flood waters. They can cause horrible infections.
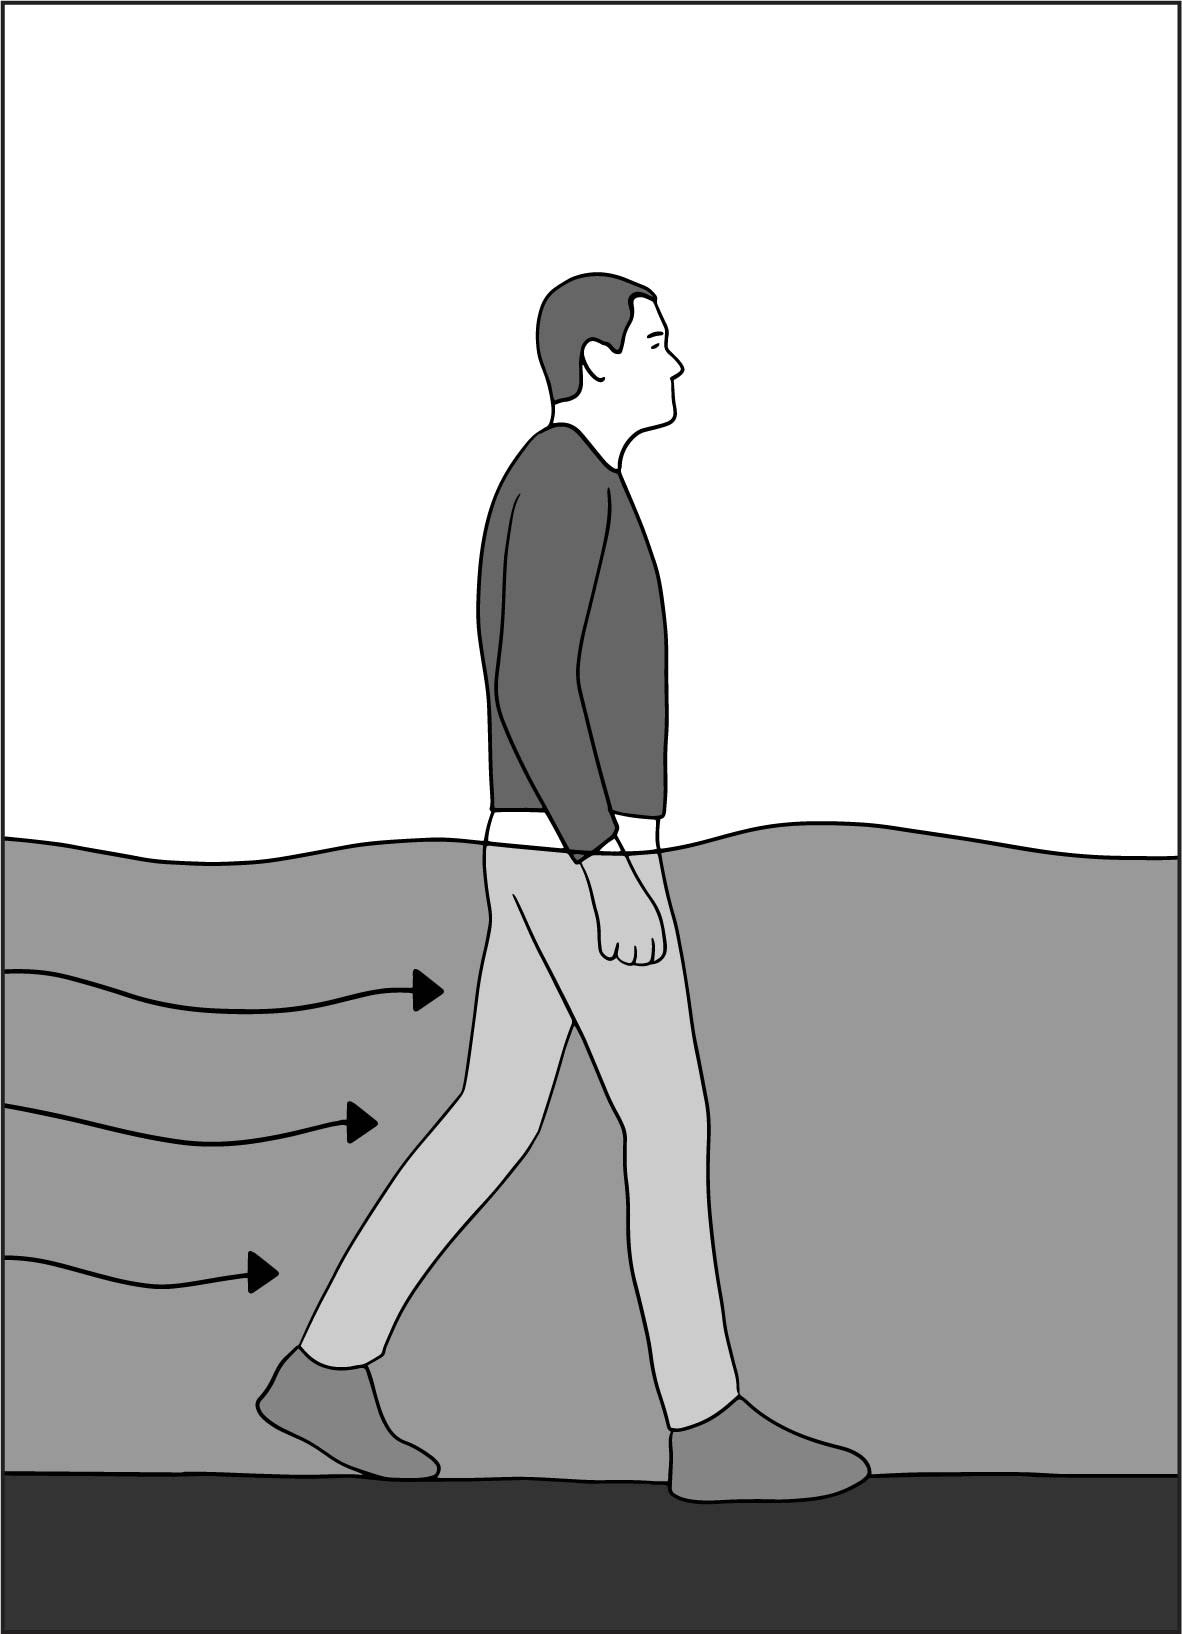
Avoid moving through flowing water.The currents are faster and stronger than you think.
Watch out for downed electrical lines or metal that can conduct electricity. You can be fatally shocked from many meters away, even through the ground. When testing something for current, use the back of your hand so if you’re shocked you won’t grab on.

Body Substance Isolation
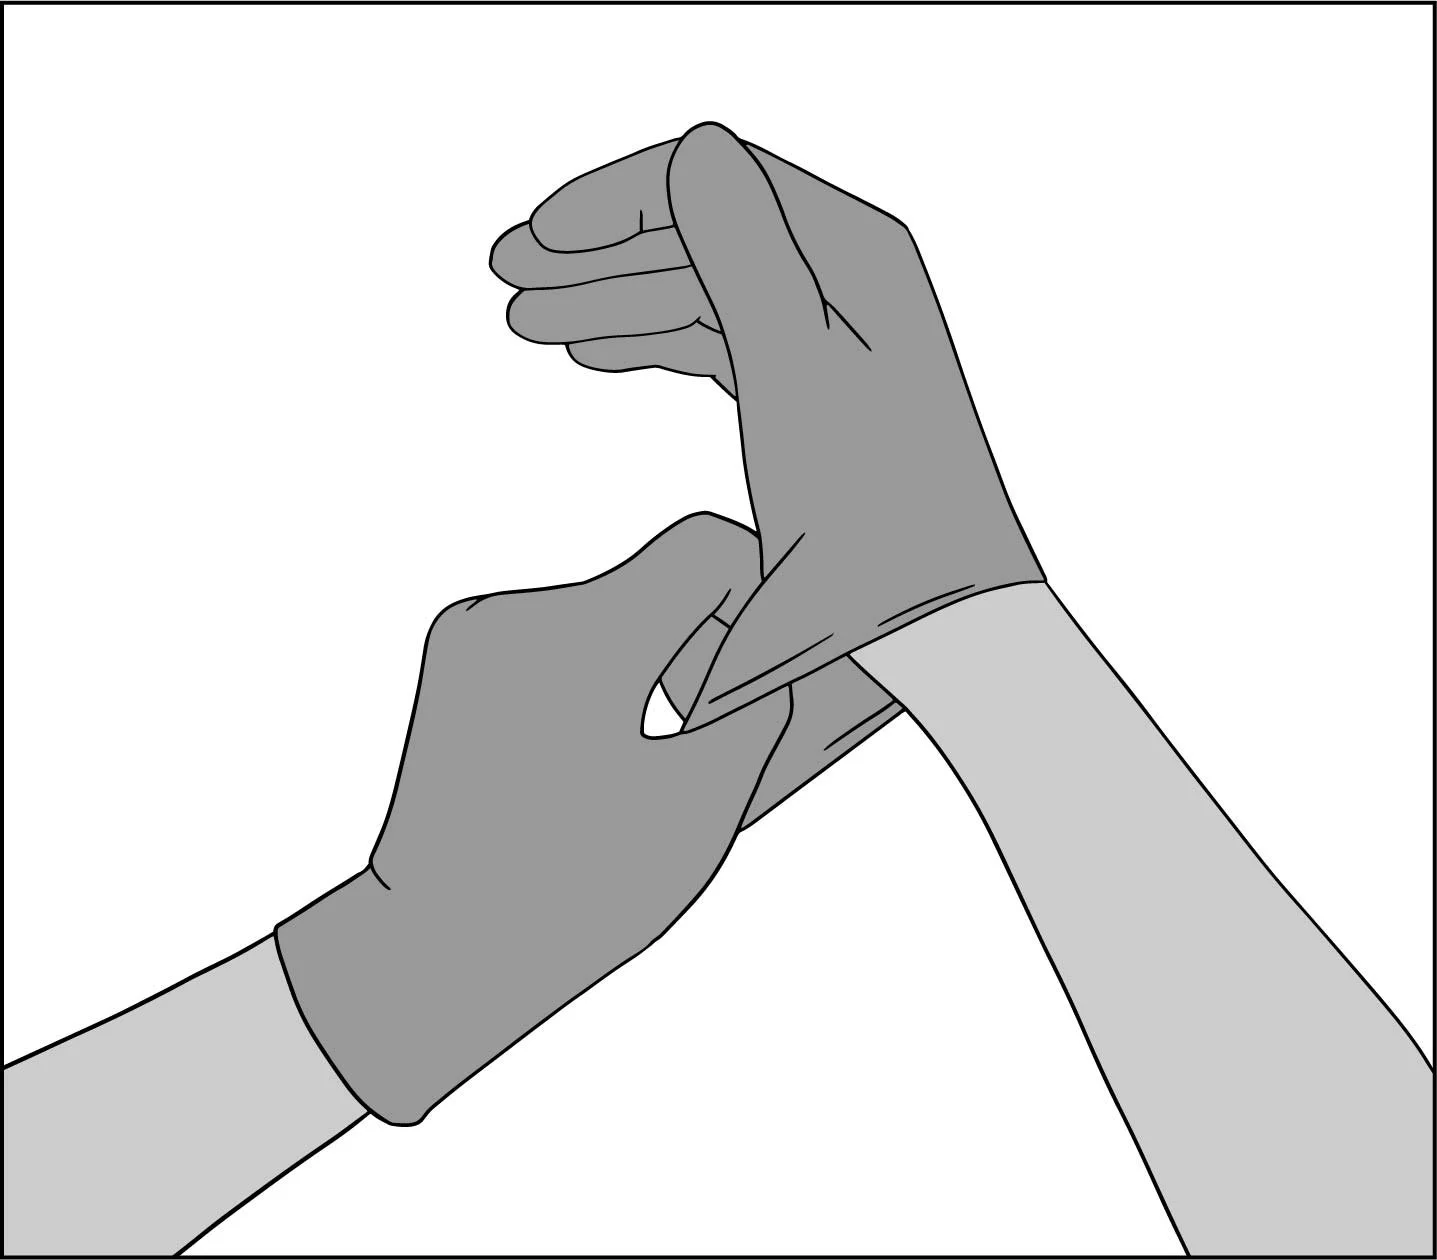
Body Substance Isolation (BSI) is how we prevent disease from spreading between a patient and their medic. Always use nitrile gloves (not latex, some people have allergies) when touching a patient.
You may want to wear a surgical or N95/FFP2 mask to protect against airborne disease.
Simple protective glasses can keep blood or spit out of your eyes.


Vital Signs

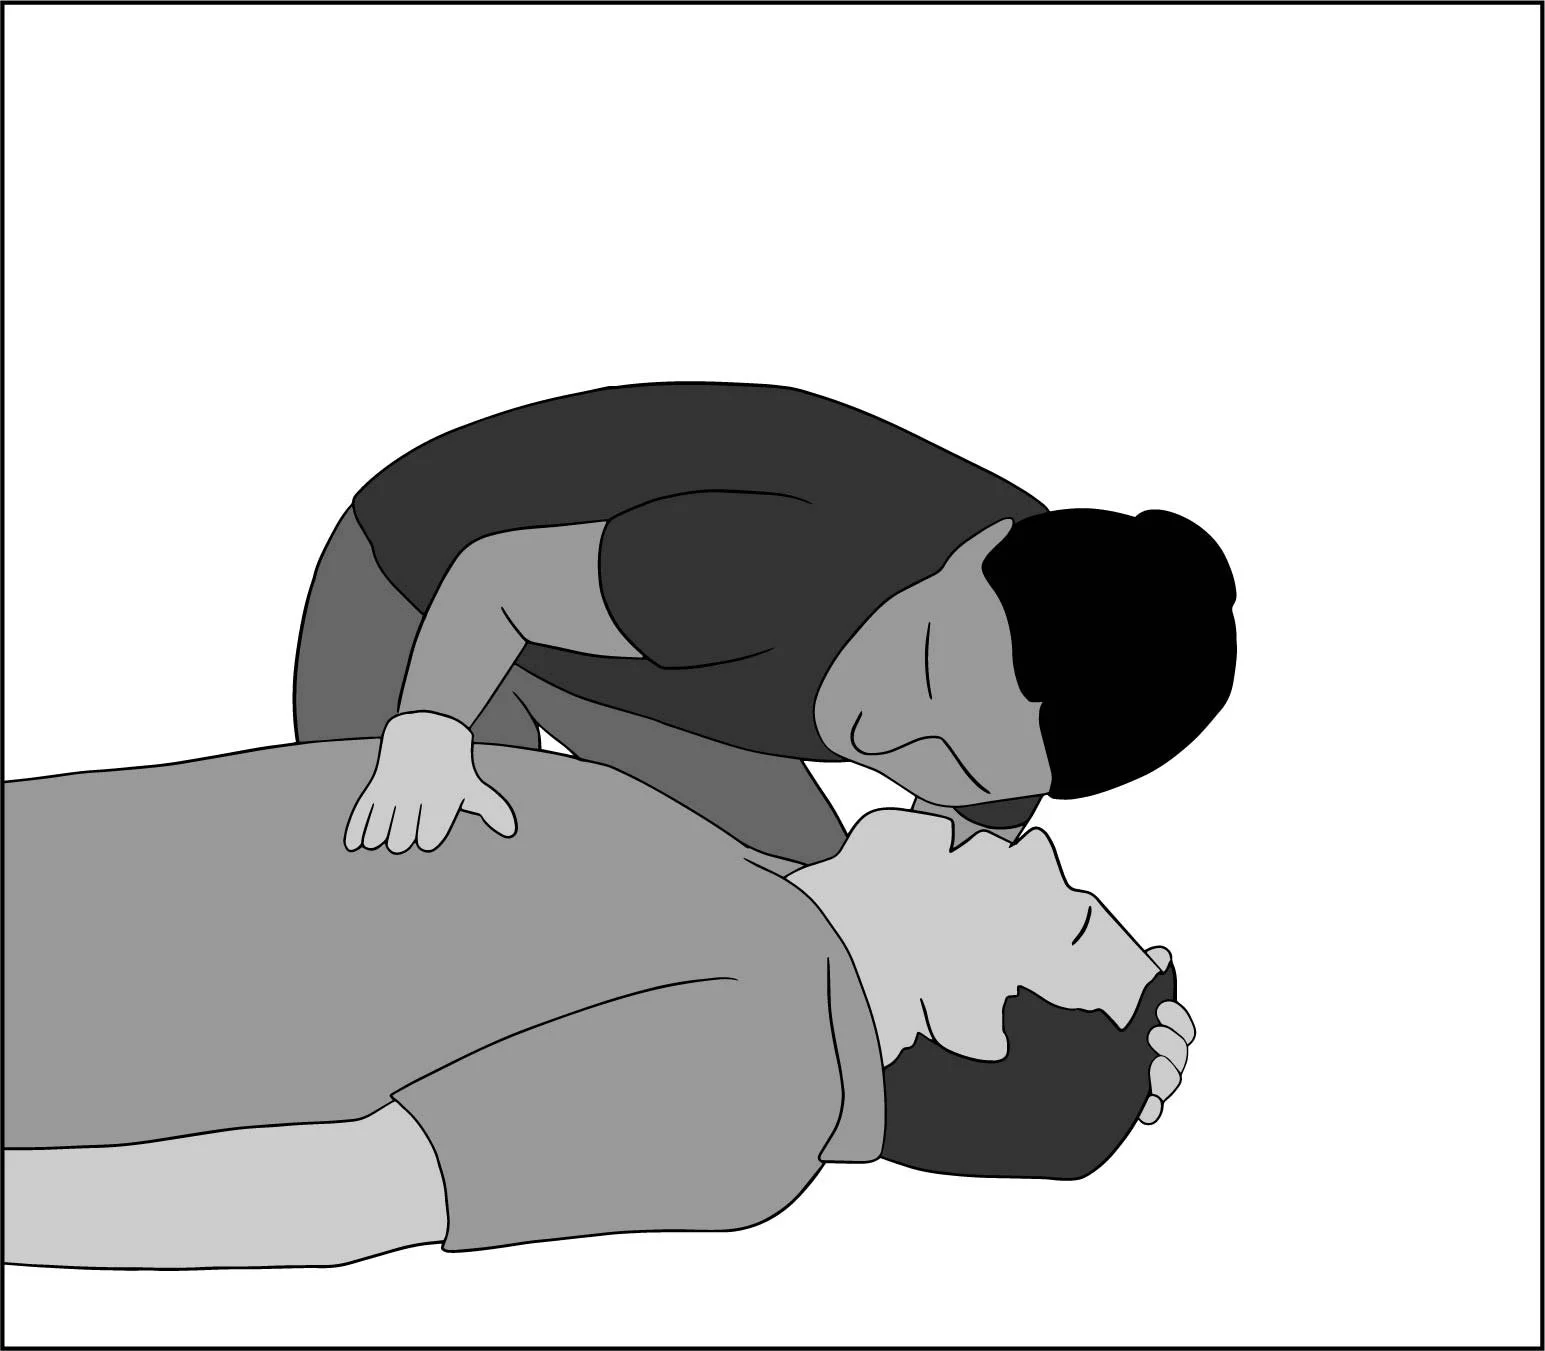
If you find someone who is unconscious, check if they are breathing.
Check for at most 15 seconds.
First, open their mouth and make sure nothing is obstructing their airway. If an object is visible, attempt to remove it with your fingers. If fluid is visible, attempt to drain it by rolling them on to their side.
Second, lean down, tilt their head back, and place your hand on their belly. Feel if they exhale against your cheek. Look for the rise and fall of their chest. Feel for the movement of their belly as they breathe.
Checking for a pulse can be difficult especially if it is cold, the pulse is weak, or you are nervous, so don’t bother. If they’re breathing, they have a pulse. If they’re not breathing, they will very quickly lose their pulse.
Rescue Position
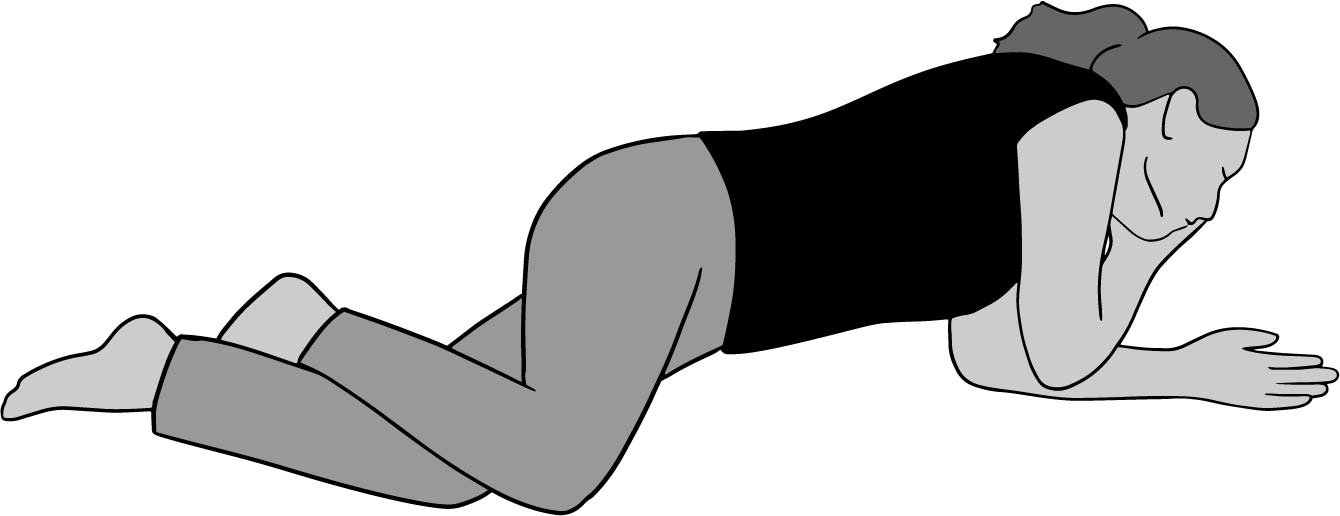
The rescue position is a position that protects a patient’s airway while they are unconscious. They lay on their side with their mouth open. Their neck is stretched so the structures of their throat let air flow. Their mouth is at the lowest point of their body so liquid like spit, blood, or vomit can flow out. Continuously monitor your patient’s breathing until they fully regain consciousness.

Dragging
If you need to move someone, roll them on their back, push them upright, place their arm on their chest, and grab it while reaching under their armpits. Lift using your legs, not your back.
When picking them up and putting them down, don’t let their head hit the ground.
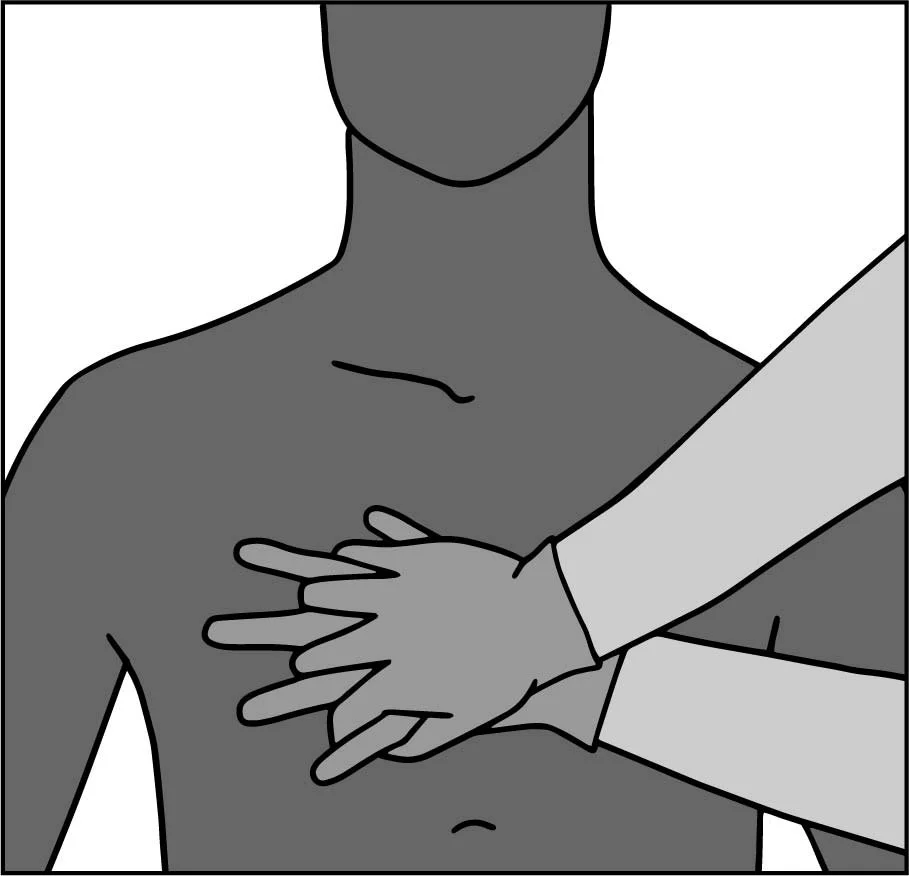
Compression-Only CPR
If your patient is not breathing, you will need to begin compression-only CPR (without ventilation or mouth-to-mouth). If you have a phone, call 911 and put it on speakerphone before beginning. Begin CPR immediately. Any delay can cause permanent brain damage.
Place your hands near the bottom of the bone in the middle of their chest. Lock your elbows.
Give 100 compression per minute (you can use the beat of “Stayin’ Alive” by the Bee Gees), compressing their chest 2-2.5” (5-6cm). You may hear the cracking or popping of their ribs; this is normal. Don’t stop until an ambulance arrives or the scene becomes unsafe.
If you know full CPR, remember: 30 compressions, 2 breaths, check ABCs every 2 minutes (6 cycles).

Wounds
If they have a wound, you need to stop the bleeding, clean the wound, and bandage it.
For severe bleeding:
First, attempt to remove what debris you can. Do not remove impaled objects. Then, raise the wound above their heart. Use gauze pads and your hand to apply direct pressure.
If the wound bleeds through, do not remove the gauze. Place more gauze atop it. Removing gauze disrupts any clots that were forming.
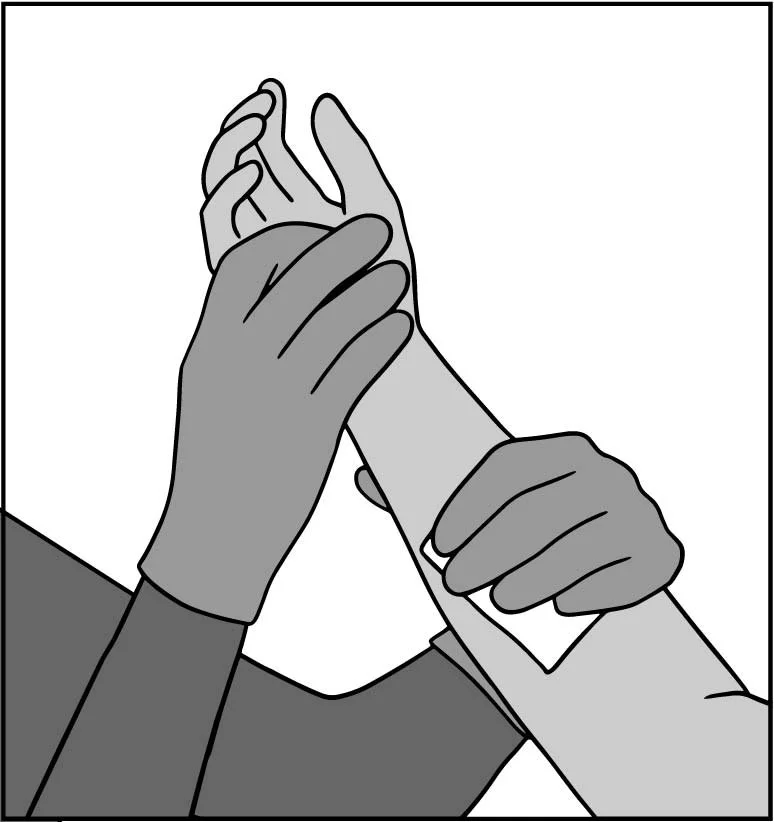
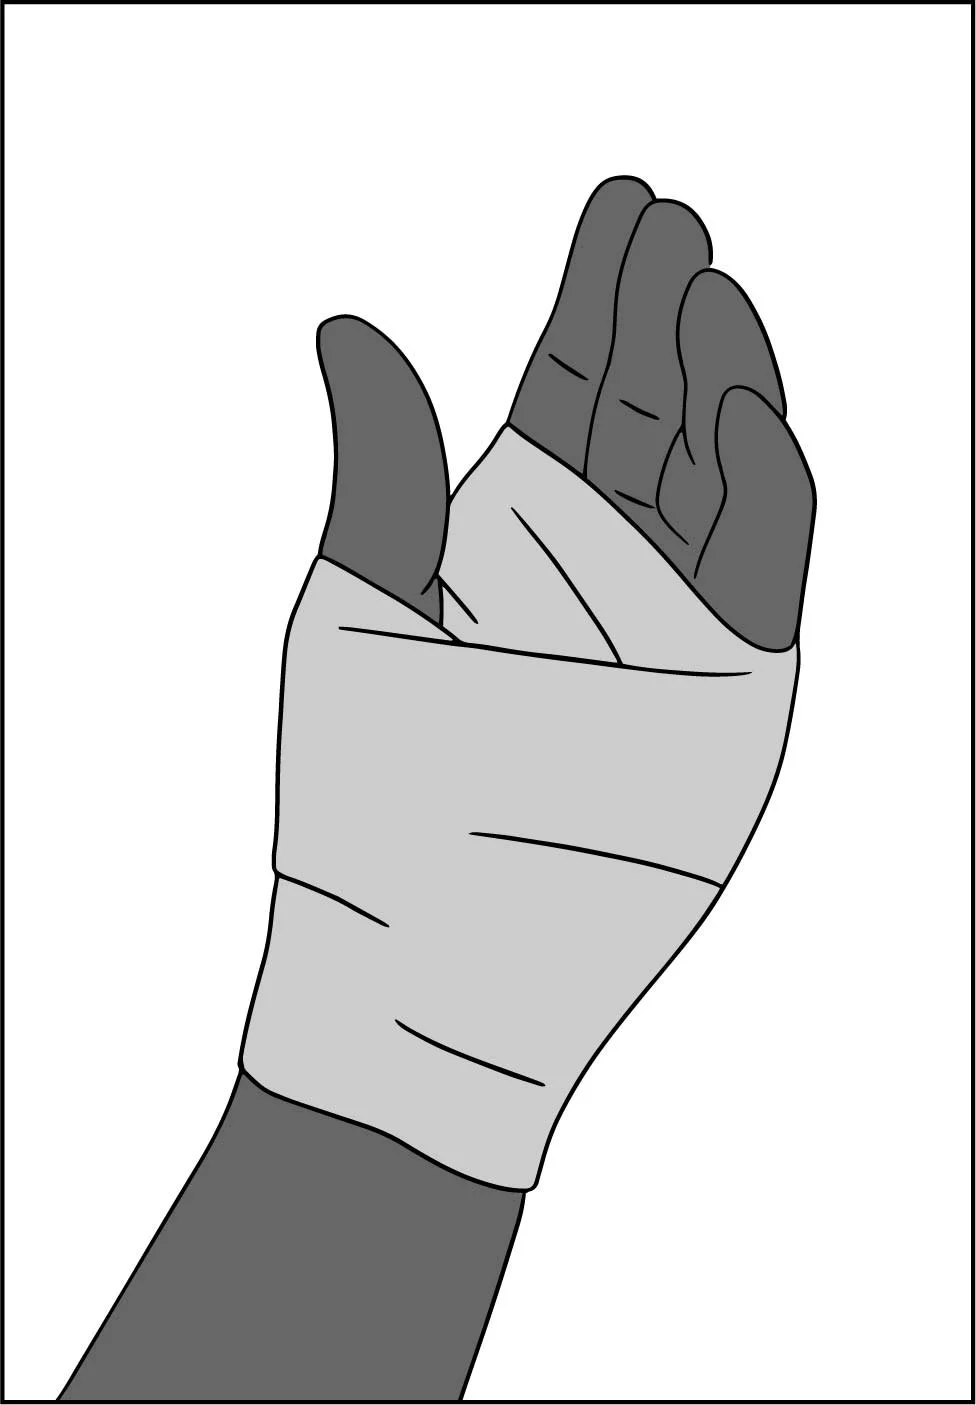
For minor wounds:
Clean it using warm, soapy, purified water to remove all debris, dirt, and foreign bodies. Treat the wounds with an antiseptic cream or spray. Use gauze pads to cover the wounds and gauze rolls to hold the pads in place.
Burns
In general:
remove them from the source of the burn
remove jewelry and constrictive clothing
do not pop blisters
Thermal burns (caused by fire, steam, or hot liquids) need to be rapidly cooled. Use cool water to stop the burning. Remove clothes if they are soaked in hot liquid.

Do not remove material that has melted on to the skin. Treat the wounds with an antiseptic cream or spray. Dress the wounds with dry gauze like you would a normal wound.
Chemical burns are caused by corrosive agents (usually a powder or liquid). For powders, first try to brush away as much as possible. Flush the affected areas with large amounts of water for at least 20 minutes. They may need to remove contact lenses after their hands are clean.
Electrical burns are electricity passing through the body. These burns damage deep tissue more than superficial tissue. This can be life threatening, and your patient should see a doctor.
If your patient has inhaled hot air or toxic gasses, they may have lung and airway damage. They may have trouble breathing or have an altered level of consciousness (drowsy, confused, in a stupor). If so, they need a doctor.
Heat Illnesses
Heat illness occurs when the body cannot cool itself fast enough. The hotter someone gets, and the longer they stay hot, the more permanent damage is done to them. Patients may or may not be sweating. They may or may not be red. If it’s hot outside and they feel unwell, assume heat stroke and cool them.
Heat cramps: stretch, hydrate, and do not massage the muscle
Heat stroke: move to the shade, remove clothing, douse in cold water, fan, help hydrate if they are alert. Submerge up to their shoulders in a cool/cold bath if possible. Do not give them fever medicine (ibuprofen, paracetamol, aspirin); it does nothing.
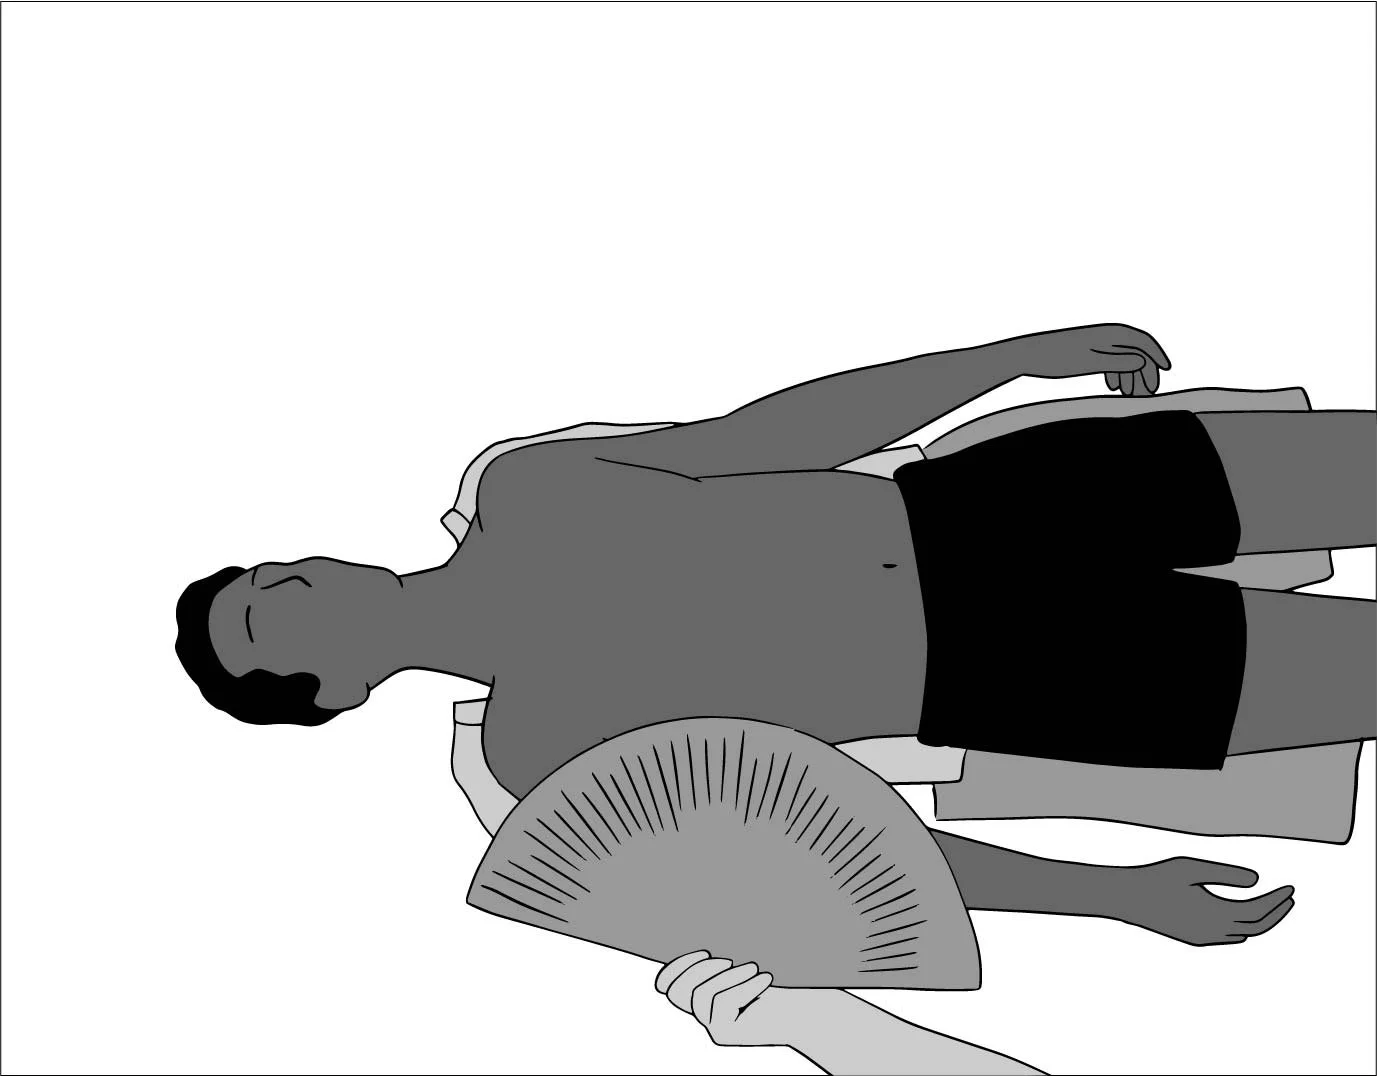
Call 911.
To help rehydrate, a simple solution is:
1 liter water
25g sugar (about one handful)
3g table salt (about one pinch)
Hypothermia
Hypothermia is a dangerous drop in core body temperature. Remove your patient’s wet clothing and put on dry clothing on them. Wrap bottles of hot water in cloth (so they don’t burn the patient) and place them against the patient’s torso. Put the patient in a sleeping bag or wrap them with blankets. If outside, protect them from wind.
If your patient is so cold that they are drowsy or have stopped shivering, they need a doctor. Be very gentle when moving them. Bumping them can dangerously disrupt their heart.

Frostbite
Frostbite is the freezing of skin tissue. Hands can be warmed by placing them under armpits. Breathing into cupped hands can warm your nose and lips.
Avoid walking on frozen feet or using frozen hands.This can damage them.
Warming is extremely painful. Give the patients non-steroidal anti-inflammatory drugs (ibuprofen, aspirin, naproxen). Place the frozen body part in warm but not hot water. Replace the water to keep it warm.
Do not attempt to thaw frozen body parts if there is a risk of them refreezing.
Clean Water
Your emergency kit should have 1 gallon (4.5L) of water per person per day for at least 3 days (1 week is better).
Options for cleaning water:
Option 1: Use a filter meant for purifying water
Option 2: Use a pre-filter and a UV sterilization pen
Option 3: Use an improvised filter (coffee filter, clean shirt, or clean bandana) and one of the following methods
Option 3a: Bring water to a full boil. Boil it for 1 minute. Above 6500ft. [2000m], boil for 3 minutes.
Option 3b: Mix 2 drops of plain bleach with 1 quarter (~1 liter) of water. Unscented, no additives, not “color safe,” must have 5.25 or 6.0 percent sodium hypochlorite as only active ingredient. Wait 30 minutes. Water should have a slight bleach smell. If not, add 1 drop, wait 15 more minutes. If there is no bleach smell, discard the water and find a new source.
Option 3c: Iodine drops or tablets can be used unless you’re allergic, have a low-salt diet, are pregnant, or have thyroid issues.
Option 3d: For a 2% iodine tincture, use 5 drops per quart/liter for clear water and 10 drops per quart (liter) for cloudy water. For tablets, follow the instructions. Usually 2 tablets per quart (liter) of water.
If you used bleach or iodine, add Vitamin C (ascorbic acid) drink mix after the water has finished purifying to cover the taste of iodine or bleach.